Saturday 24 October 2015

Just Popping in...

to share an idea that has worked and could be of use to others! I don't know about you but I enjoy the displaying of things nearly as much as the making. It is the chance to play with colours and shapes and put together something that is pretty to look at.

I decided to focus some crafting on a local sale that is being held to raise money for the Air Ambulance and wanted a way of displaying the stuff that would be easy to assemble and create a display.

As luck would have it, we had some warped doors replaced a couple of weeks ago and the old ones were left for recycling the wood as kindling... that was until I had other ideas.

Having taken a door apart I got to work with an electric saw and screwdriver and some chalk white paint and ended up with this...

Christmas Tree display stand

I am no carpenter, and YES the angles aren't exact by any means but it is fairly sturdy and does the job don't you think? The ribbons are just tied into a hole at each end of the branches. The badges and scrunchies are then pinned to the ribbons so that they can easily be removed and (hopefully!) sold.

The lavender bags and pin cushions can be placed at the bottom of the tree like presents.

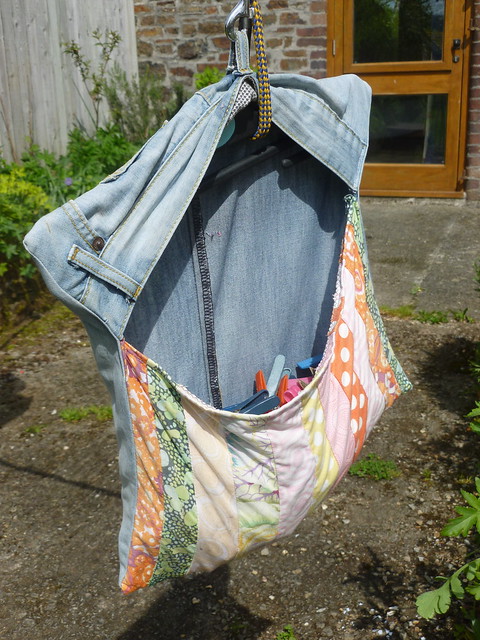
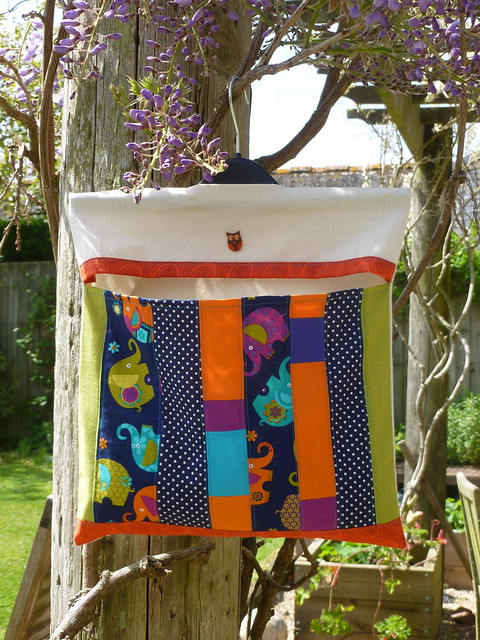
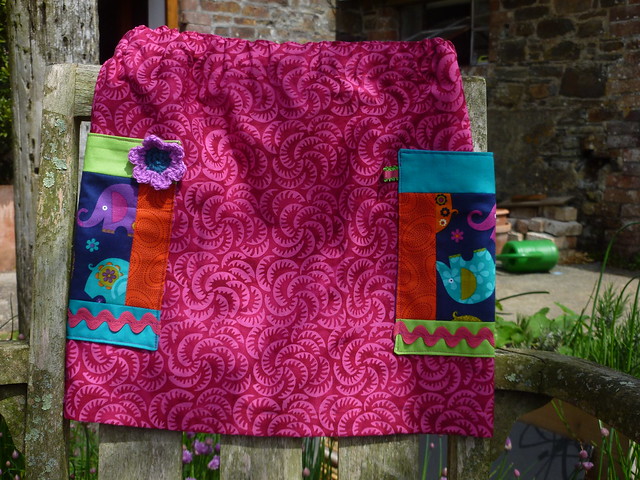
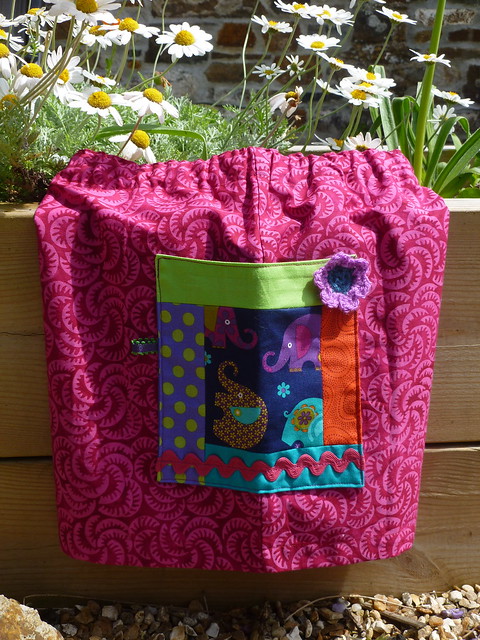
Just a couple of peg bags to find a hanging spot for but that should be relatively easy.

Mini peg bags

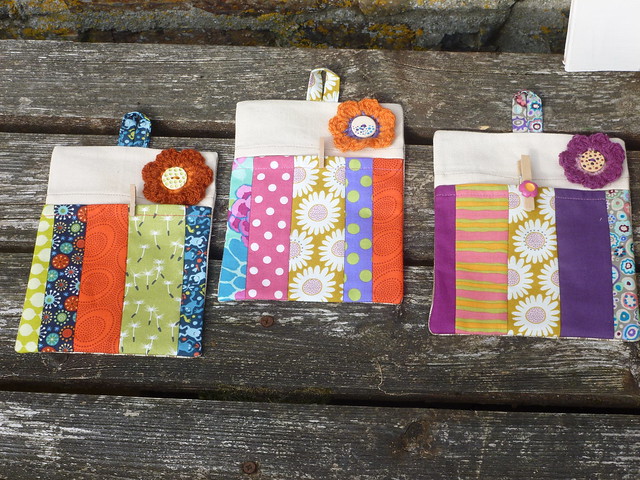
These are some mini peg bags which I will fill with some little pegs and string which can be used to display Christmas cards.

Large peg bags

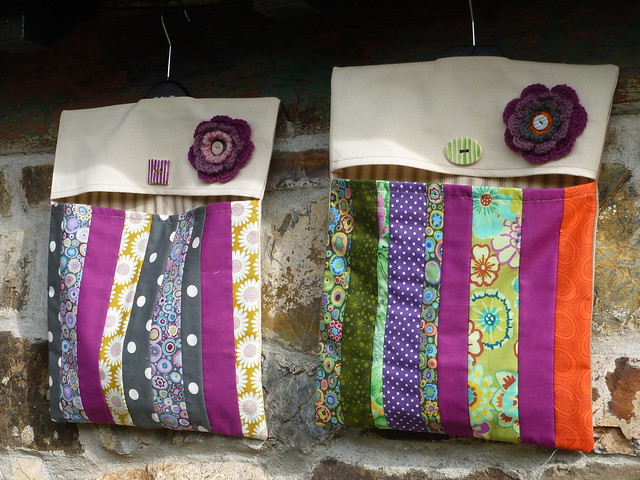
And these are the larger ones for normal sized pegs and I made a tutorial for these a while ago which you can find here.

 The crochet flowers are basically the triple layered flower, as shown in the tutorial by Lucy at Attic 24, but I missed off the outer row of colour.


Pin cushions and lavender bags

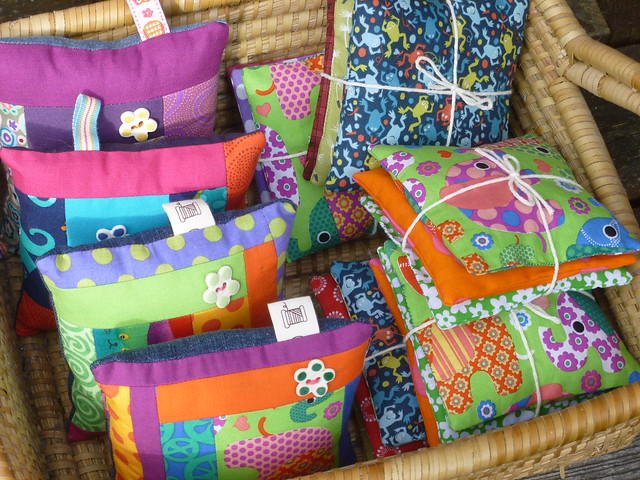
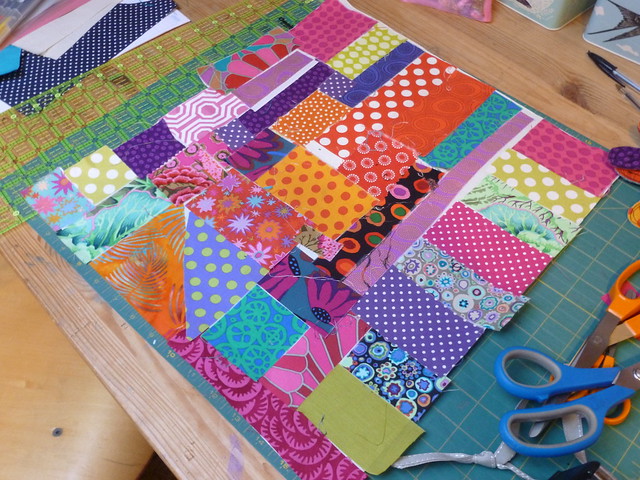
The pincushions are little bits of log cabin backed with denim, and the lavender bags were made using scraps from my stash and this years lavender.


Bottom of the tree..

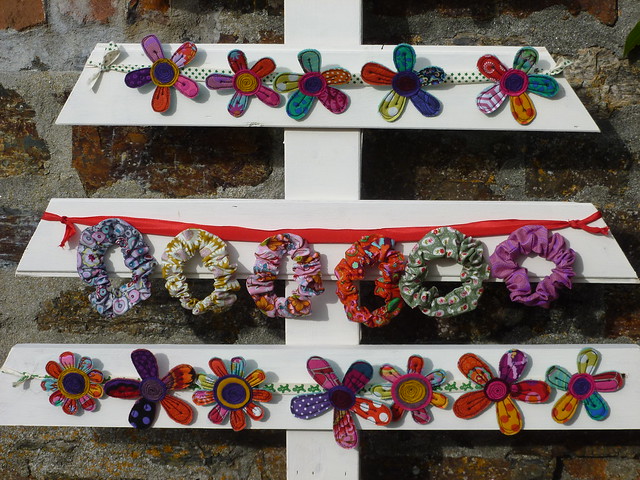
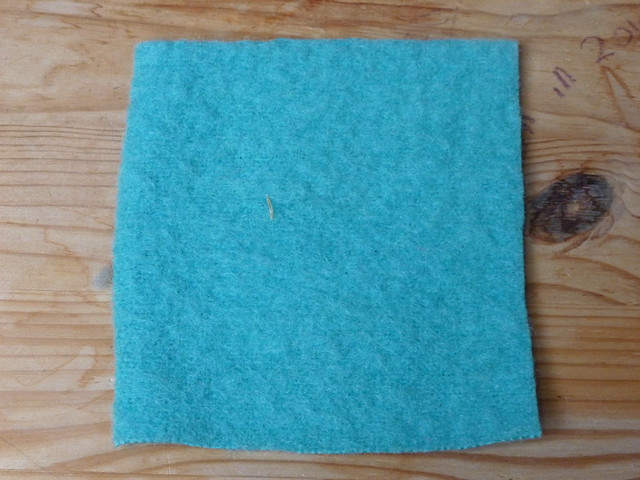
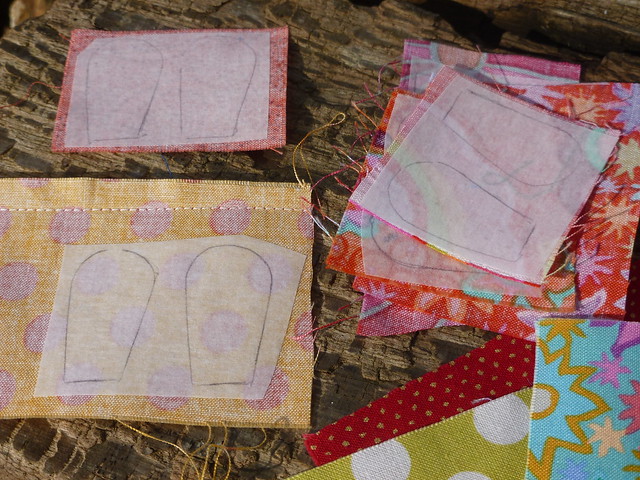
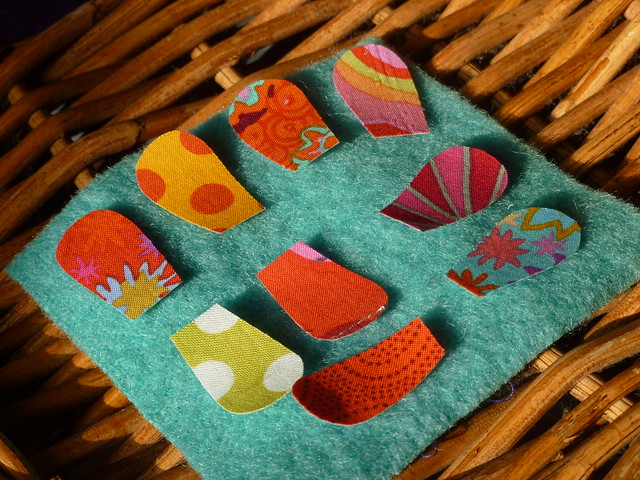
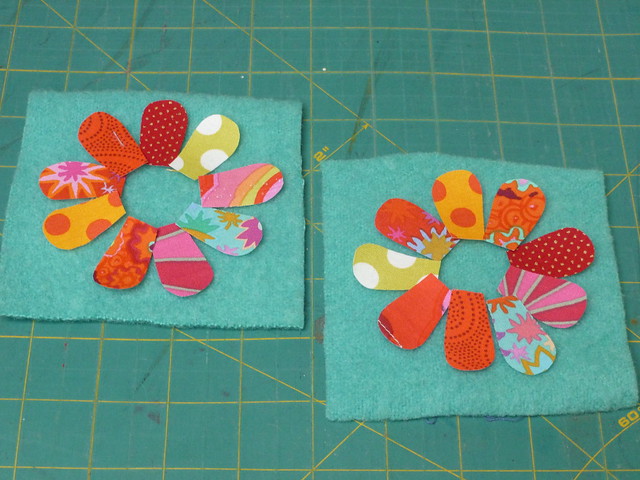
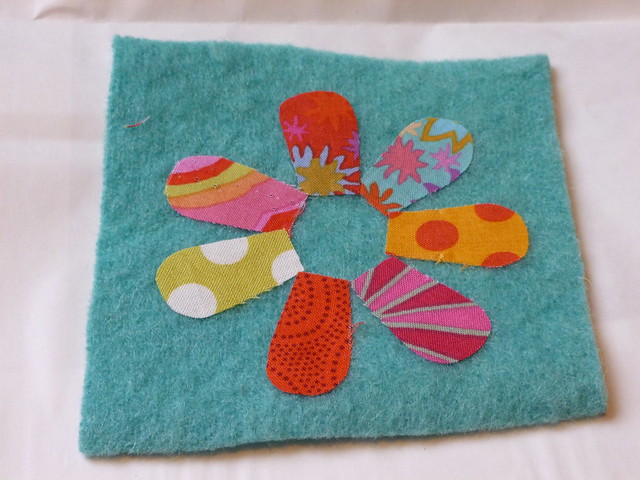
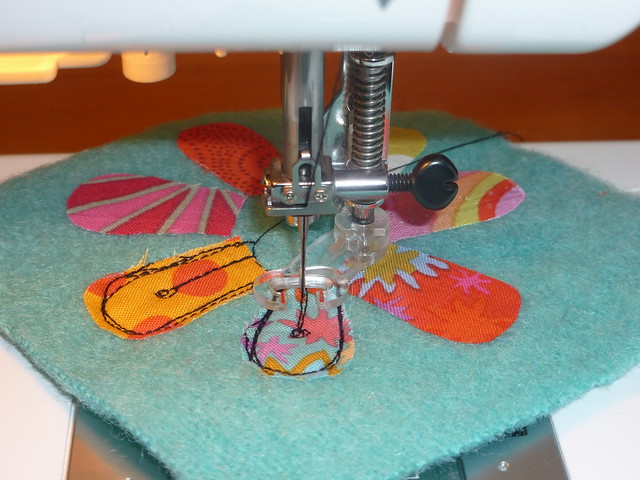
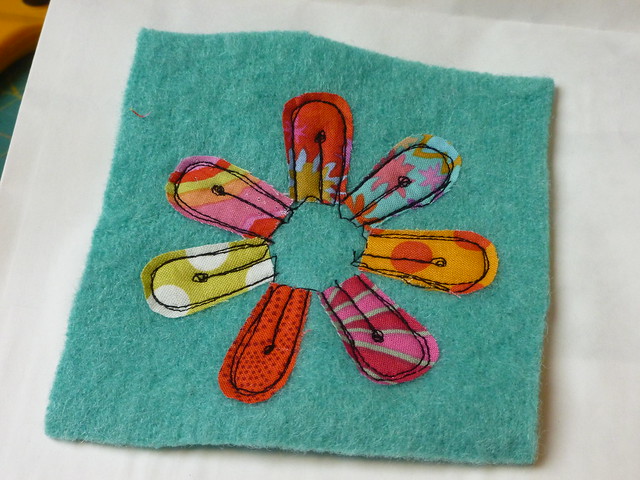
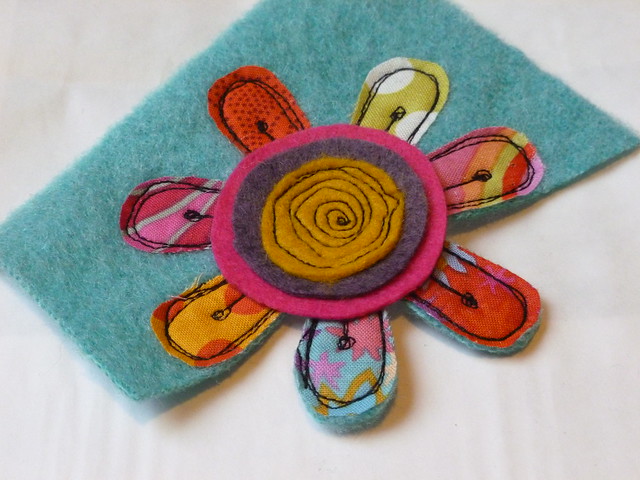
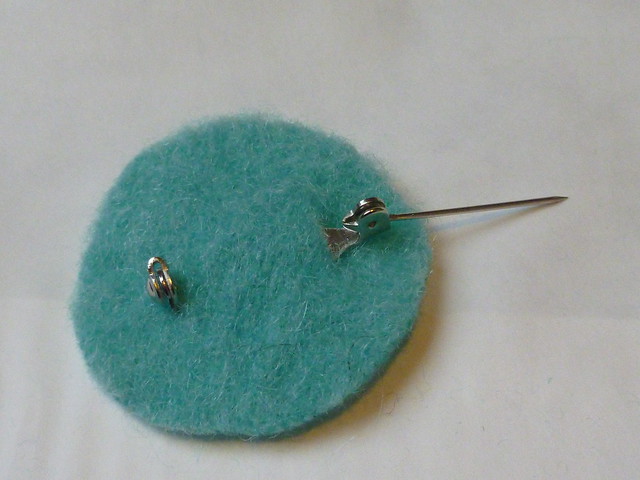
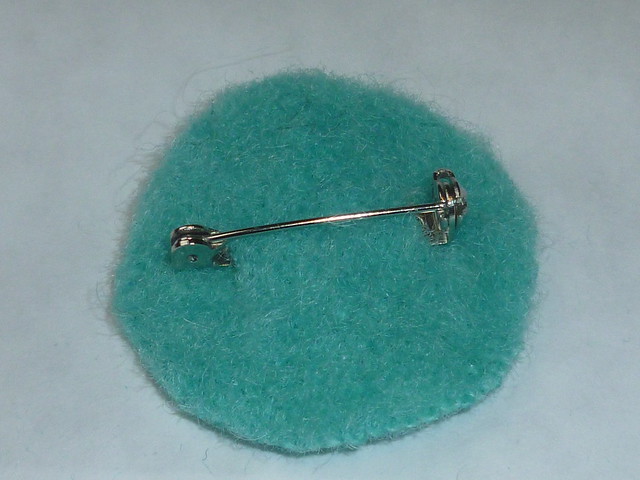
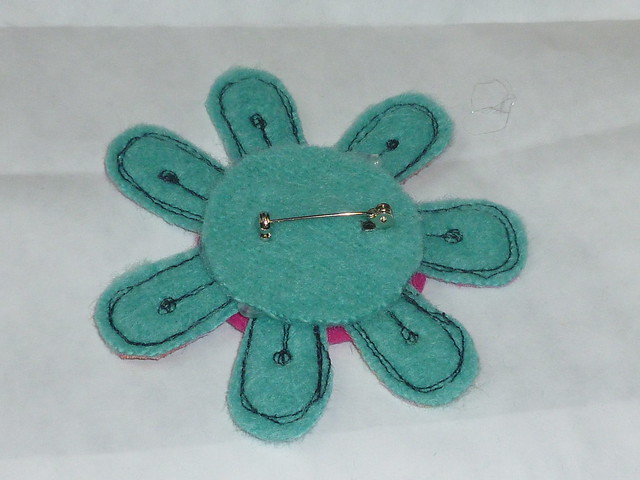
The flower brooches are fun to make and use up the smallest scraps that you can't bear to throw away and the tutorial for those is here.

Scrunchies are just tubes of fabric around a piece of elastic but they are kind to hair and get used a lot in this house, in fact they go walking as fast as they are made unless pinned to a tree like these!

Interested Lizzie..

I had a little bit of 'help' with the photography from Lizzie who we were looking after but she was very good and didn't pinch any flowers!!!!

Happy making.

Monday 25 May 2015

Taking a break

I will be taking a break from blogging for a while. My photos will still be over on Flickr where I keep a record of my sewing and growing, but life is pulling in different ways and blogging is a time consuming business. So I will leave you with the first poppy of the season.. 
 
First poppy of the season

What a cracker.
 
Vicky x

Monday 18 May 2015

Colour in the Garden

I love May.
The garden really starts coming to life and every day there is a new flower or shoot to see.

Anthemis cupaniana- sicilian chamomile

Anthemis Cupaniana (Sicilian chamomile) - known here as Carine's daisises. She gave me a sprig to root about 8 years ago and we now have 5 or 6 huge plants. They flower their socks off until summer time when they can be dead headed to leave the silver foliage.

Aquilegia- or Granny's Bonnet

Aquilegia or Granny's Bonnets are self seeded all over the place. I have tried growing some other varieties but they don't seem to do as well as the wild ones.

Chives

Chives. Again self seeded from one very small clump grown from seed and far too many really but I can't bring myself to dig them up because they look so pretty.

Wisteria

The wisteria has finally reached the top of our pergola after 7 years. My dream of sitting underneath shaded from the sun is still a way off but does now seem a possibility.

Osteospermum

Osteospermum- an old favourite.

Valerian

Valerian- planted on top of a wall to try and compete with the ivy and stingers. Doing well now that it has established.

Violas

Violas by the back door- planted last autumn and nearly given up on until we went away at Easter and they were tended by person with green fingers and lots of patience! (not me)

Centaurea montana Purpurea- or Mountain cornflower

And finally for the flowers (yet more purple!!) the Centaurea montana Purpurea - or Mountain Cornflower. It spreads like wildfire but I figure anything that competes with the weeds and looks this good has got to be ok.

WIP- cosy blanket number two

Cosy Stripe Blanket number two is coming on but more slowly due to the lure of the garden.

WIP- some more badges in the making

And this is another WIP - scraps bonded to some double sided sticky stuff ready to make a few more badges.

Tally is snoozing again in her favourite place

Tally is outside in her favourite spot again taking it easy!

Monday 11 May 2015

Tally and some Tutorial links

 
Tally and the daisies
 
We have had a busy couple of weeks Tally and I,
 so this is a well earned rest in the sunshine in her favourite spot.

Despite the busyness there have been some small bursts of sewing and I thought that I would share  links to some favourite tutorials, so here goes.

Firstly it's 'new peg bag' time of year again. Every year when the weather starts improving and I risk putting the washing on the line, the state of last year's peg bag usually means that it is time to make a new one. I am sure that if it got looked after better it would last for more than one season but I am afraid that it regularly gets left out in all weathers and ends up like this...

Sad old peg bag from last year!
 
This year the coat hanger also gave way, and so as you can see it is strung up with an old dog's lead looking particularly pathetic!
 
The new one is already in use and was made using the same old method
 which I have tried to share in this tutorial.
 
New peg bag 2015
 
 I would love to hear if you make one,
 or if you have any problems with the instructions I will do my best to explain.

Next up, was a Harmony Drawstring Skirt. This is a present for a little girl who will be 7 and the pattern and tutorial are found at Sew Mama Sew here.

Child's skirt
 
Just to show you the pocket which is sort of wrapped around the sides of the skirt.
 
Skirt side view showing pocket detail
 
 
 It's the simplest of patterns but lots of fun to make. I added a few tabs of ribbon, some ric rac, and a little crocheted flower from the Mollie Makes tutorial here.

And finally, The Girl requested an oven glove for a friend.
 Not the most usual of presents for a 17 year old
 but something to do with chicken nuggets!!!- don't ask.
 
I turned to an old favourite, Lotta Jansdotter's Simple Sewing,
which has an oven glove pattern in it, but unfortunately I seem to have lost the pattern piece and so ended up making it up a bit. I followed her method though and I think it turned out ok.

Oven glove
 
I like the spiral quilting she suggests for both sides.
 
Oven glove-reverse
 
I'm off to sit in the sun with Tally and have a coffee.
Happy sewing.
Vicky x


Monday 27 April 2015

Mini Quilt and Magnolia


The mini quilt is finished and just happened to match the magnolia
which came out about the same time. I love it when that happens.


 Cosy stripe blanket number two is also coming on, but remind me not to mention sitting in A and E again as shortly after I wrote that last post we had another trip there with the boy,
and an injured ankle!
Luckily it was a relatively short trip, with time for just two or three rows of blanket,
 before being sent on our  way with no broken bones to be reported.


Do you find yourself sewing or making things that match the flowers and the season?

Saturday 18 April 2015

Car Crochet


Crochet is brilliant for those times that you have to sit and wait in the car, on the beach, on the side of a pitch, in A and E, anywhere really.
Last week I had lots of waiting to do and decided to make some flowers.
 The triple layer pink edged one is a pattern from Attic 24 and the others were from the
free crochet flowers patterns at Mollie Makes.


I did a little bit more on the mini quilt, adding some hand stitching and a few finds from the beach, more on that soon.
Mainly I sat in the sunshine with cosy blanket number two...


The idea is to separate bands of colour with stripes of grey but it hasn't been as easy as I hoped.
Looking for inspiration, I decided that Lucy's pegs might be a useful way to help work it out but having no pegs to hand, I had to make do with an Easter egg box chopped up which actually did the trick nicely.


We were away for Easter Sunday and at popular request I got some eggs to do a hunt in the garden but it seemed almost a shame to eat them when they looked so pretty on the blanket.


There were some great hiding places in our tiny garden by the sea.
Rock crevices, stones, hedges and even a little shed!


One blue egg was never found so it's still there hiding somewhere
 or else it's been stolen away by a magpie!

Friday 3 April 2015

Two shades of Grey

It's a very grey day here and I have just received a welcome package through the post with some grey yarn (as well as some other colours) for a new cosy blanket that I am starting.


I decided that one wasn't enough because it is a very popular blanket on our sofa. 
The combination of the treble clusters and straight trebles give the blanket a lovely texture and cosiness that the others don't seem to have and so on these cold days there is a fight for it!
Having chosen to go for a second blanket in the same pattern, a new palette of colours seemed the way to go for a bit of variation. For the original blanket I stuck to Lucy's lovely Cosy Colours and her pattern without a second thought and so this seems a bit scary and could go very wrong!

 I have been playing with some fat quarters which are mainly Kaffe Fassett I think.
This is a sort of mini quilt in progress..


I'm not sure what it will end up as but I am planning to give it some hand quilting and embellishment.
 
This one is another plus quilt in the same fabrics with a healthy dose of white.
Again a work in progress with a long way to go.

 
It was the colours in these fabrics that have inspired the new cosy blanket which is not really my usual colours but I am really enjoying them so far.


Monday 30 March 2015

Using up the yarn stash.


I can't quite decide on the next big project at the moment after finishing my  Cosy Blanket so I have been using up some of the leftovers and generally fiddling about.

Firstly our neighbour's sign to keep the cows off, still had a piece of Christmas yarn bombing on it so was in desperate need of updating. Holly leaves in March is taking things a bit far. That said, I am amazed that the stuff had lasted all that time outside in the wind and rain. This time we went for the spring look, with cosy colours and a sprinkling of teeny tiny flowers
 (the pattern for these is over at Attic24 here).


I am not even sure if they have been spotted yet as the weather has been fairly grim since I put it up!
 
Next up was a cushion cover.
Mainly made from leftover yarn from the blanket,
but with the addition of some Plum as the shop was out of Grape (Stylecraft DK Special).  
I'll give you a sneaky preview but I am waiting for a sunny day to get some better pictures and do the colours justice..


Do you have some favourite leftover projects to use up your yarn?
I am wondering about fingerless gloves next or maybe a beanie hat.

Spring continues to spring down here in Cornwall with lovely sploshes of colour and shoots coming up all over the place..


great big clumps of primroses in the hedgerow..
 
 
this sparkly blue clump of chionodoxa forbesii (I had to look that up!!) by the veg bed..


and these beautiful hellebore flowers from the garden which are floating in a glass dish on the kitchen window sill catching any fleeting rays of sunshine here today.


Wednesday 18 March 2015

Spring Sunshine

Spring is definitely springing down here in Cornwall. The sunshine today is just beautiful and great for photos which is handy because I finished my Cosy Blanket last night!


I just love it. Thank you to Lucy for the pattern and colour choices which are what makes it.


I followed the pattern to the letter and the only change was a different colour choice in the border so that it goes well on our green sofa.


I used grape (top and bottom) and pale rose (sides) for round 1 of the border, Claret for round 2, Khaki for round 3, and finally Lime for round 4.


This has to be my favourite blanket and crochet experience so far. It is so snuggly to sit under and I am already feeling a bit lost without it and wondering if maybe a second would be too much!!
Maybe a different colour combination but that would be risky! Or maybe same colours and a different pattern, now there's a thought...
 
The light was so tempting this morning that after dropping the kids to school I felt the urge to ignore all the jobs that needed doing and head for the hills.
 
 
This is the cheese ring on Bodmin Moor which is where I found myself heading. It was so early that there was still  mist in the air and no one else in sight.


As the mist cleared the sky was clear blue...
 
 
Just one more Tor wouldn't hurt surely?!
Sharp Tor..


The views were fantastic and my companion was very happy.
This, by the way, is Tally. Aged 9 and the reason for the name of this blog.


I really must go and do some jobs now but they are no worse for the slight delay.
And tomorrow there is rain forecast and I have to go to work.
 
I hope that you were able to enjoy some sunshine too.

Sunday 1 March 2015

Flower Brooch Tutorial

Ok, so here goes on the flower brooch tutorial
but you will have to let me know if this makes sense because tutorial writing isn't my strong point.
 
Flower brooch tutorial

Start by cutting a square of blanket or thick felt (felted jumper would also work for this).
It needs to be big enough to allow a 1-2cm border around the flower.
If you sketch the finished flower size and shape that you want on a piece of paper first this will give you rough dimensions to aim for.

Flower brooch tutorial

Next, go to your scrap pile/box/heap and root through for the petals.
 This is where you can use up some of those weeny bits of your favourite fabrics that you just couldn't bare to part with.
Iron them flat and then draw the petals you want on some Bondaweb (or other double sided bonding type stuff!) and cut out leaving a small border, before peeling off one side of the paper and ironing onto the scraps of fabric (see above). 
Flower brooch tutorial

Cut out the petals.
You should have ended up with a bunch of petals like this and the next step is to play around with them until finding a layout you like.
There is a lot of playing around with colourful scraps in this project
 which I guess is why I enjoy it so much!
Flower brooch tutorial

When you have the petals as you want them, peel off the other paper on the bondaweb (this is a bit tricky as the petals may be small but I found that making a very small sort of tear just started it off).
Place the petals back in the position you planned and iron in place...
Flower brooch tutorial
You should now hopefully have a square of blanket with the petals stuck to it as above.
Now for some fun with free machining..
 
Flower brooch tutorial
 
I used black thread (top and bobbin) but you could use any colour you like.
Drop the feed dogs and put on a free motion/darning foot and go ahead and do some "drawing" on the petals any way you like. I used a couple of loops of stitching to roughly outline the petals and added a stamen on each one on this flower. Remember that the central part will be covered by felt in a minute so wobbles there don't matter.
Flower brooch tutorial
 
Next cut some circles of coordinating felt (or other fabric if you like).
These can be held in place by some more free machining (as below in a spiral) but equally you could hand stitch this bit or add a button if you wanted.
Flower brooch tutorial
Now cut away the blanket around the petals and you are nearly there.
 
Flower brooch tutorial
For the pin, I used a brooch clip pushed through two small slits in another circle of blanket.
(If you don't have a brooch pin, a small safety pin will also do the trick and can be sewn on).  
 
Flower brooch tutorial
This can then be glued to the reverse of the flower.
(Hot glue works well but any craft glue would do).
Flower brooch tutorial
And that's it!
You will hopefully have ended up with something like this.
They can be pinned to a present, bag, coat or anything you like really.
 
For children I would attach the flower to a hairclip,
band or bobble as an alternative to the pin.
 
I would love to see if you make some and if any parts of the tutorial don't make sense please let me know and I will do my best to try and explain!


Happy sewing.
Vicky x

Sunday 15 February 2015

Bits, bobs and brooches


Hi folks and thank you for popping in.
This week I have been using up some leftovers and making some small projects.
They will probably be going towards a charity craft sale later in the year.
I like the idea of making a box of stuff that can be added to
when in need of a "small fix" of sewing, between the bigger projects.
 I used to make things for the school fair but our primary school days are now well and truly over!
 
First up were these brooches..


I had a shape in mind and hunted for a tutorial but couldn't find the right one, so after a bit of playing around and a few false starts these were the result. Has anyone else found a good fabric flower tutorial that I may have missed?
It's early days yet and there is a bit more experimenting to do shape wise..


The very first one was made to put on Mum's birthday present...


Next up were a pile of little 4" pockets ready to be made into lavender bags.
Most of the material is left over baby quilt fabric.  


And finally some little 4"(ish!) pincushions.. 


with recycled denim on the reverse and a little tab for decoration. The cute tab was tape given to me by a sewing friend so I'm not sure of the source, sorry.
 

 If anyone has any other ideas for craft sale makes,  I'd be grateful for some tips?
 
I hope you have a good week.
Vicky x

Saturday 7 February 2015

Baby Quilt and Big Sister Bunting


I did it!
I managed to finish the baby quilt yesterday and braved the icy winds to get some pictures.
This one is a present for a teacher.


I based the quilt around the lovely elephant fabric which came from Fabric Rehab.  


The reverse is made from a flannelette sheet as usual.


The edge is bound with one and a half inch bias strips cut from some pale pink spotty fabric.


The Big Sister Bunting was made from some of the left over fabric and edged along the top with shop bought bias binding (2cm width).
 As the name suggests, it's for the big sister so that the baby doesn't get all the presents. I think that this maybe something close to my own daughter's heart as she was the one who kindly suggested it!


And while I was making bunting I whipped up a second row for someone who had a 50th birthday this week because I think that no one is ever too old for bunting!
This time I used some cotton webbing just folded in half along the top and I like the effect and would definitely use it again. It was 2cm width which was just right.
 
Happy weekend.
 

Thursday 5 February 2015

Winter light


I love the light here at the moment. We have been having some beautiful sunsets but you have to watch out because they don't last long, and I never seem to have my camera with me.
 
I am still working on my Cosy Blanket which is getting cosier by the day and is now lovely to sit under while I'm working on it.
The other work in progress is another baby quilt and some bunting and I may be able to show you more at the weekend if I get a move on! Famous last words, it's a bit busy round here at the moment.

Monday 26 January 2015

WIP and woodwork


The Boy is enjoying a bit of woodwork at the moment and needed ideas for what to make, so I suggested a shelf for my cotton reels not really expecting it to materialise.
Yesterday after a while in the shed, he came in with this. It's fab and I love it!
I am already planning the next shelf request.

I haven't had a lot of sewing time this week but have added a fair few rows to the Cosy blanket.

I have managed to cut out and sew together another baby quilt top too. This one is going to be bright and based on this elephant fabric, from Fabric rehab.


The request (from the Girl!) was for some bunting for big sister too.
I can't resist a bit of bunting making as it is quick and easy and very satisfying. I really don't need any more myself so it's nice to have an excuse to make some as a present for someone else. The quilt fabrics were just perfect.


More soon.


Wednesday 21 January 2015

Plus Annabel


The plus quilt for Baby Annabel is now finished and soon to be wrapped and on it's way.
As I said, the fabric is a mixture of new and old with a fair few recycled shirts in there.
The quilt is backed with pale blue flannelette.


The edge is bound with bias strips cut from a stripy shirt.


And we even have some sunshine here today to get a picture but it's a bit parky to be out for long!

Monday 19 January 2015

Cosy evenings by the fire

Sometimes life gets in the way of sewing a bit but I am hopefully back on track now and I have a lot of ideas buzzing around waiting to be made.

I have been looking at various 'cross' quilts for a while now, so when our friends had a baby before Christmas it was a perfect excuse to have a go at a quilt, to follow on from the cross cushion I made in the summer.
 I particularly like some of the quilts made by Ashley from Film in the Fridge. Her colour combinations are just lovely and she has made a number of 'plus quilts' both as smaller baby quilts and larger ones. Just feast your eyes on these beauties!

I set to work with just a fat quarter of elephants (not sure of the designer sorry!), a few bits from my stash and a bunch of recycled shirts, and this was the result..


I cut a stack of four and a half inch squares and just laid them out until I found a pattern I liked before sewing them up in rows. Easy peasy, just how I like it!
The quilting is also very simple straight lines forming tram lines on either side of each seam.
I just have the binding to do now.

Also keeping me going since Christmas has been my beautiful basket of Cosy Colours designed by Lucy from Attic 24..


The colours are simply scrumptious!
I am following her Cosy Stripe Blanket to the letter found here.


It is a brilliant design for tucking into on these cold evenings in front of the TV.
Long straight rows of double crochet that come together fairly quickly and allow for concentrating on the plot of silent witness at the same time!!


And the colours are so bright and cheerful.
I love it.

Sunday 18 January 2015

Life and Lavender Bags


Sorry for the lack of posts and thank you for coming back to look!

I will be up and sewing soon.