Showing posts with label peg bag. Show all posts

Monday, 11 May 2015

Tally and some Tutorial links

 
Tally and the daisies
 
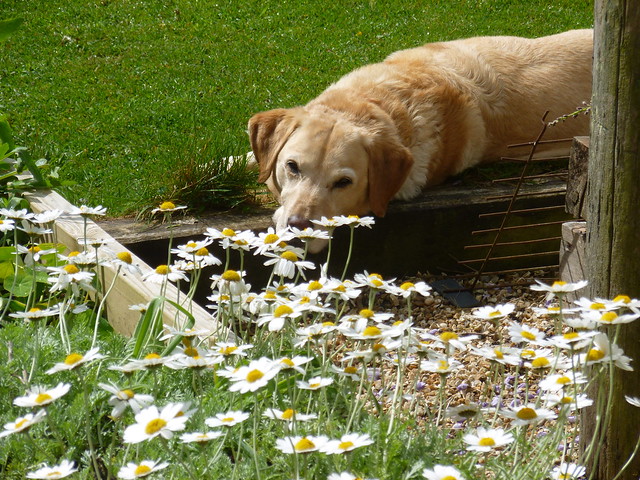
We have had a busy couple of weeks Tally and I,
 so this is a well earned rest in the sunshine in her favourite spot.

Despite the busyness there have been some small bursts of sewing and I thought that I would share  links to some favourite tutorials, so here goes.

Firstly it's 'new peg bag' time of year again. Every year when the weather starts improving and I risk putting the washing on the line, the state of last year's peg bag usually means that it is time to make a new one. I am sure that if it got looked after better it would last for more than one season but I am afraid that it regularly gets left out in all weathers and ends up like this...

Sad old peg bag from last year!
 
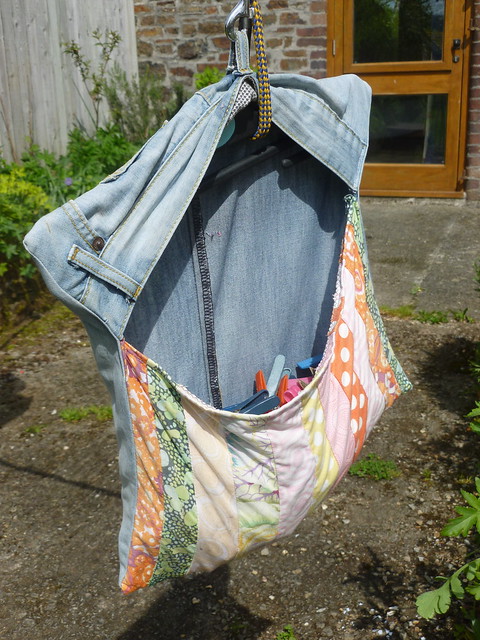
This year the coat hanger also gave way, and so as you can see it is strung up with an old dog's lead looking particularly pathetic!
 
The new one is already in use and was made using the same old method
 which I have tried to share in this tutorial.
 
New peg bag 2015
 
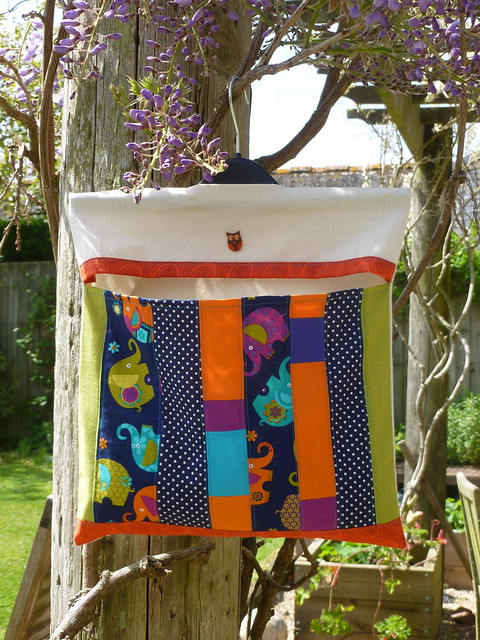
 I would love to hear if you make one,
 or if you have any problems with the instructions I will do my best to explain.

Next up, was a Harmony Drawstring Skirt. This is a present for a little girl who will be 7 and the pattern and tutorial are found at Sew Mama Sew here.

Child's skirt
 
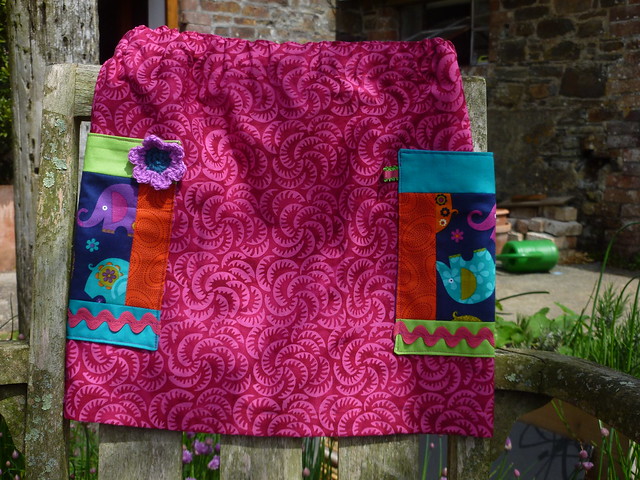
Just to show you the pocket which is sort of wrapped around the sides of the skirt.
 
Skirt side view showing pocket detail
 
 
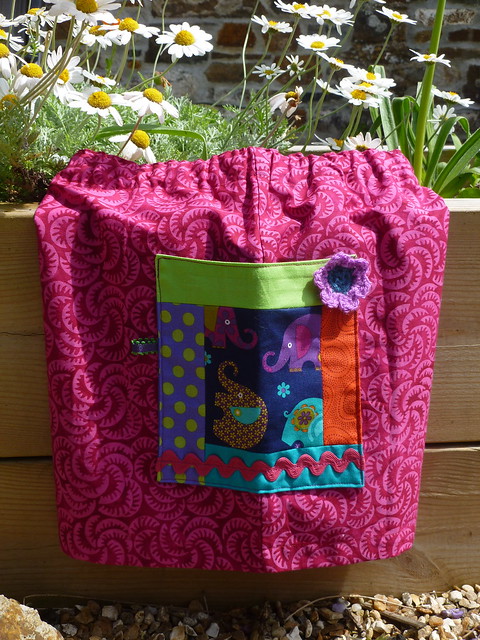
 It's the simplest of patterns but lots of fun to make. I added a few tabs of ribbon, some ric rac, and a little crocheted flower from the Mollie Makes tutorial here.

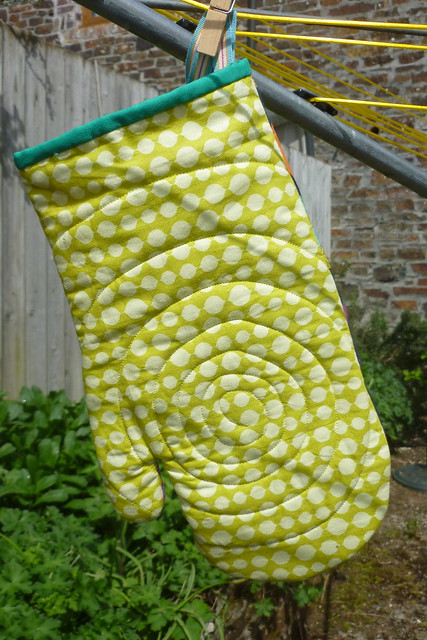
And finally, The Girl requested an oven glove for a friend.
 Not the most usual of presents for a 17 year old
 but something to do with chicken nuggets!!!- don't ask.
 
I turned to an old favourite, Lotta Jansdotter's Simple Sewing,
which has an oven glove pattern in it, but unfortunately I seem to have lost the pattern piece and so ended up making it up a bit. I followed her method though and I think it turned out ok.

Oven glove
 
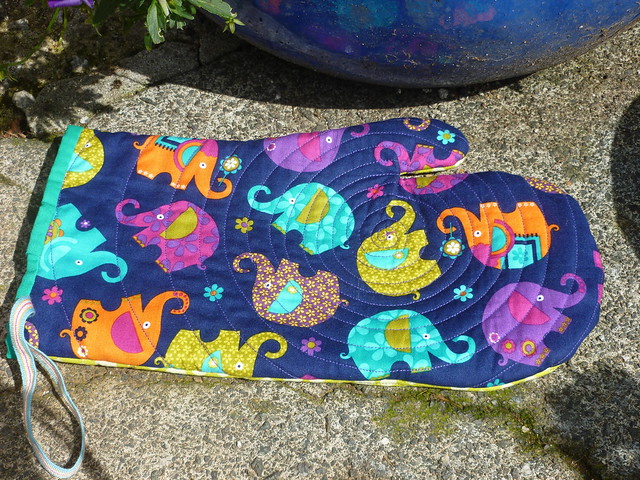
I like the spiral quilting she suggests for both sides.
 
Oven glove-reverse
 
I'm off to sit in the sun with Tally and have a coffee.
Happy sewing.
Vicky x


Wednesday, 25 June 2014

Summer Wedges


I have already blogged about the Angry Cushion on the left, and today I finished the one on the right, Summer Wedges.
 
The pair of them are now sitting on the sofa looking very bright and cheerful.


This one started with 36, 10 degree wedges sewn together to form a ring.
I then turned under the edges and appliqued the whole thing onto a
 25" square piece of pinky-purple linen.


I used some wadding to back the panel and did some circular quilting in the centre and around the edge of the wedges to hold it all together.


The reverse is made from the remaining piece of purple velvet with a concealed zip
as for the Angry Cushion. 


I was lucky enough to have had a whole day of sewing with not a lot else on, bliss.

The second project was to make a new peg bag
as last years was looking a bit sad.


This time I used old jeans to make the back and top sections,
with stitch and flip on the bottom panel as before.
(My tutorial can be found here).


I managed to use the waist band for the top section and so I didn't even have to hem it, sneaky!


When I went out to get pictures of the cushions the new peg bag was already in use
 and  I like this 'real life' picture with the birthday bunting still up
 and waiting for another June birthday in a few days.
 
Have a good week.


Saturday, 7 September 2013

Pretty Pegs and a Pot

A new peg bag
 
I made a new peg bag yesterday as last year's one broke and I have been using one from a couple of years ago that looks very sad...
 
The old peg bag!
 
If you want to make one too, I made a tutorial for this a while ago that you can find here.
The flower was made using this tutorial over at Cluck Cluck Sew.
 
 
A basket cover

I also managed to get a picture of a basket cover I made for someone while we were away this summer.
It is completely made up and not quite the same at both ends, but it did the trick of keeping the flies off the veg while we were camping!

And finally, I wanted to show you this lovely Orla Kiely pot that I was given a while ago for my birthday and which I am ashamed to say was looking a little unloved when the person who gave it to me called round.

My birthday pot by Orla Kiely
 
I have now bought some basil,
as my efforts to grow some failed,
 and the pot is looking rather gorgeous on the kitchen table.
Thank you K
x


Sunday, 30 December 2012

Little pegs need a little peg bag.

Big peg bag little peg bag

This was a present for Mum who, the week before christmas, asked if I could get her some little pegs from the market to put cards up with.

A pot of little pegs
 
Then a little pile of yummy scraps used for a different present (yet to be shared!), suddenly had a reason to be put together to make a miniature peg bag for the new pegs.
 
Little peg bag
 
I used exactly the same method as for the larger peg bag, explained here, except on a smaller scale and found a plastic hook that had been on a bag of socks at some point.

Little peg bag detail

Friday, 20 January 2012

This year's peg bag.

The 2012 peg bag

I've made myself a new peg bag as the old one was looking very sad.

The old one is a good example of the problem of using a totally wire hanger if you have alot of pegs like me..
last years peg bag

The poor hanger is sagging a bit.
So the new one has a plastic hanger with a metal hook. I'm just hoping that it can take the strain.
I'm having trouble finding the right cords to finish the curtain but will keep looking.
The liberated baskets are being quilted by hand so it is taking a while.

Happy weekend.

Wednesday, 27 April 2011

Peg Bag tutorial as promised.

Start by choosing a coat hanger to base the peg bag around. I think that the ones that work best have a metal hook that will swivel on the base. The skirt hangers are good to start with because they are straight once you have removed the 'clippy' bits.


Then you need to cut out 3 pieces of material. This coat hanger was 13" wide so I cut a backing piece 2" wider at 15" x 15". The second top front piece was 15"x 5". The third bottom front piece was 15" x 11".(This last piece will be covered with stitch and flip so only needs to be a scrap like left over curtain lining).
Next cut some strips of varied widths from any fabrics you fancy and play about with them until you like the effect.
Stitch the strips to the bottom front piece of fabric using the stitch and flip technique.
Keep going until you cover the whole of the front bottom piece. Zig zag along top edge and turn under about 1/2".Sew.                       Also hem bottom edge of top front strip and embroider or add any 'frills' eg ricrac.
Next place backing fabric right side up on table. Then place front top and front bottom pieces on top of the backing piece, right sides down. Use coat hanger to mark gap to be left in upper edge for the neck of the hanger (3" in this case). Pin and sew around the perimeter of the square about 1/2" from the edge leaving the marked gap. You can also zigzag edges to neaten and hold if you want/can be bothered!!
 Turn right way out, insert hanger and i usually sew a button through all layers to hold hanger in place and also this allows bottom front to gape a bit which helps get the pegs out. Now fill it with pegs and enjoy! It makes the boring job of hanging out the washing a bit more enjoyable.

Tuesday, 26 April 2011

Peg bag-time for a new one!

Untitled by Textiletally
Untitled, a photo by Textiletally on Flickr.
It has taken me long enough for me to get this from Flickr to the blog! i will try to post some instructions on how to make it for you Mum but it may take a while so bear with me.